In this article from dorontash handicrafts magazine, we are going to teach you how to do embroidery at home. Because embroidery is one of the beautiful arts that has attracted the attention of many people. Learning embroidery at home is not difficult and you don’t have to spend a lot of time and money on it. It is so simple that you can learn it with a little effort and interest.
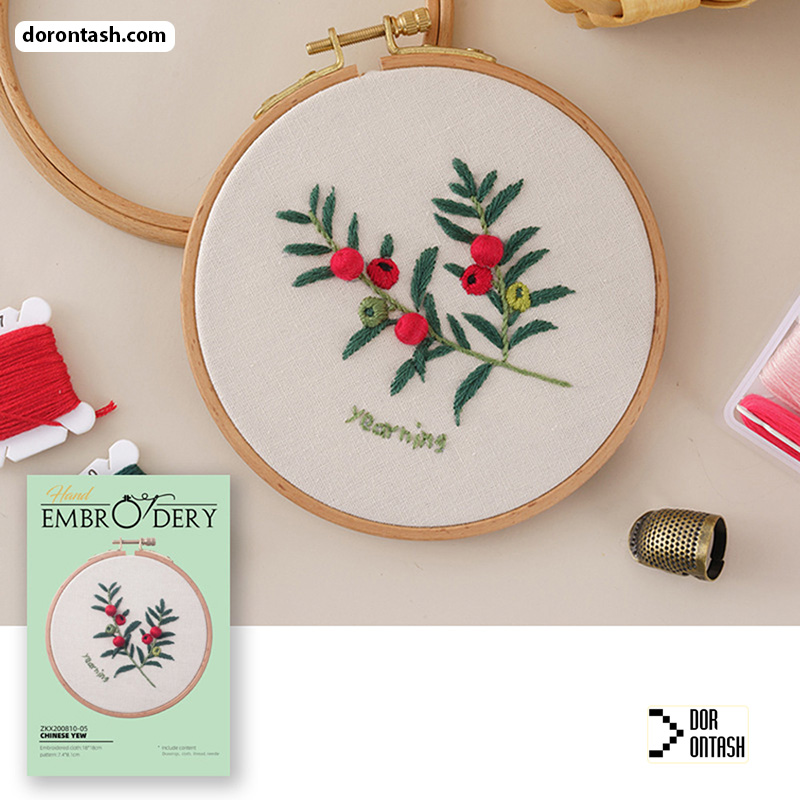
Learning embroidery at home and earning money
Since embroidery is considered a handicraft, it can lead to earning money. Many housewives can learn this art by teaching embroidery at home and sell their handicrafts at handicraft exhibitions. . Because buying handicrafts is valuable and enjoyable for many people.
video of embroidery
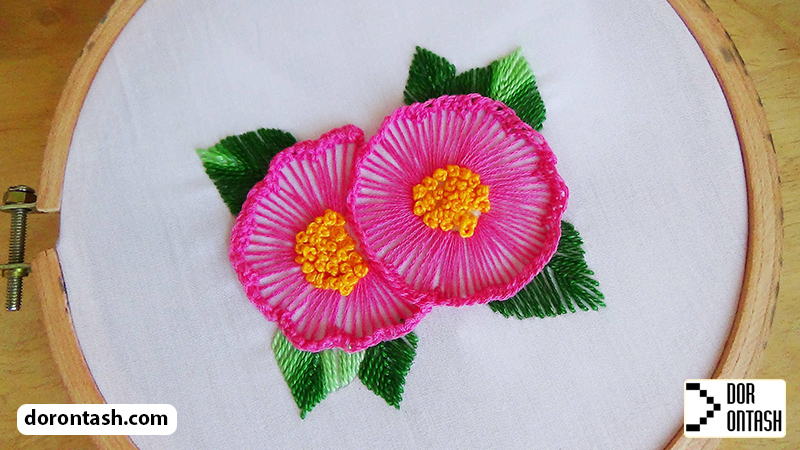
Types of embroidery
The art of embroidery has different types that are welcomed in different cultures and countries. Among these embroideries, the following examples can be mentioned:
1. Redwork embroidery
In this type of embroidery that is popular in America, red thread is mostly used and the designs are usually worked on white fabrics.
2. Number embroidery (cross stitch)
This type of stitching, which is one of the types of embroidery, is also known as cross stitch. In this type of embroidery, you can buy different and beautiful designs that are offered in the market and complete your whole design by using colored threads and cross stitch. This type of embroidery is very simple and effortless.
3. Embroidery of black designs
White fabric and black threads are used in this type of embroidery, which has Spanish roots.
4. Candlestick embroidery
In this type of embroidery, white fabric and threads are used. The entire design is completed using a large number of knotted stitches.
5. Embroidery using spun wool thread
This type of embroidery can make the designs very prominent and vivid. Actually, in this type of embroidery, only woolen threads are used and mostly chain stitch.
6. Arrasene embroidery
In this type of embroidery, designs are worked on silk and wool fabrics. Beautiful colors are eye-catching in this embroidery.
7. Sashiko embroidery
This type of embroidery is native to Japan. Its designs are very simple and are embroidered using waterfall stitch. In this type of embroidery, you can create very beautiful designs.
Embroidery training at home Necessary supplies for embroidery at home
| Supplies | approximate price | Description |
| drawing pencil | From 8 thousand tomans to 1 million and 300 thousand tomans | Using drawing pencils or water-soluble drawing tools, you can embroider and draw the designs you want on the fabric you want. Use pencils so that when you wash the fabric with cold water after finishing the embroidery, your drawn design will be completely erased. |
| embroidery thread | From 18 thousand to 280 thousand tomans | Embroidery threads are inexpensive and come in a wide variety of colors. Of course, the most common embroidery thread is Demsa thread (DMC), which is of good quality. |
| Embroidery workshop | From 12 thousand to 600 thousand tomans | This is a two-part ring device. You place the fabric you want to embroider between the two rings of this workshop and fasten it. In this way, the fabric remains smooth and firmly in place and the embroidery work is done more easily. Embroidery workshops are made in plastic and wood. Plastic and wooden workshops are no different from each other and you can do your embroidery work with any of them. But if you want to display your embroidered work or hang it on the wall, using wooden workshops will give more effect to the embroidery design. |
| embroidery needle | From 5 thousand to 2 million and 800 thousand tomans | You must use special needles for embroidery. Compared to other needles, these needles have a bigger eye and you can pass all kinds of threads through it. |
| scissor | From 8 thousand tomans to 5 million and 500 thousand tomans | When embroidering, you often have to use a new thread and you have to cut the old thread. Therefore, you need a small and sharp pair of scissors. |
| embroidery needle | From 5 thousand to 2 million five hundred thousand | You must use special needles for embroidery. Compared to other needles, these needles have a bigger eye and you can pass all kinds of threads through it. |
| Cloth | From 10 thousand tomans to 8 million and 500 thousand tomans | Thick cotton, linen or canvas fabrics are very good for embroidery work; Especially linen fabrics have good strength for embroidery works. |
Embroidery training at home How to use the embroidery workshop
Embroidery workshops are produced in different designs; But the round type is more common. You can get this device from Kharazis.
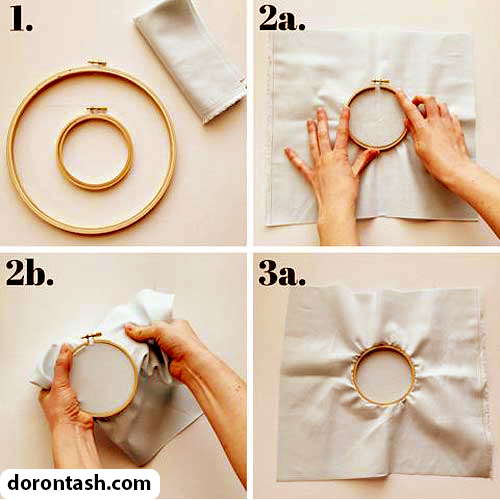
Cut your embroidery fabric larger than the diameter of your workshop. Then open the screw of the workshop and separate the two parts of the workshop. Place the fabric on the smaller ring. Then, with the help of the larger ring, keep the fabric firmly in place. Now tighten the workshop screw. In this way, the fabric is placed firmly and flat on the workshop.
Embroidery training at home / several sewing models
Teaching basic and simple stitches
1. Simple waterfall stitch Running stitch
Simple waterfall stitch is the most basic type of stitch in hand embroidery. To do this sewing, first pass the needle under the fabric and then insert the needle to that side of the fabric at a distance of about half a centimeter. Then insert the needle again with a distance of half a centimeter from under the fabric. Do this until the end. Practicing this stitch will help you to adjust the size of your stitches so that you can have a regular stitch. If you don’t know which fabric is suitable for embroidery and number embroidery, we suggest you to read the article on suitable fabric for number embroidery.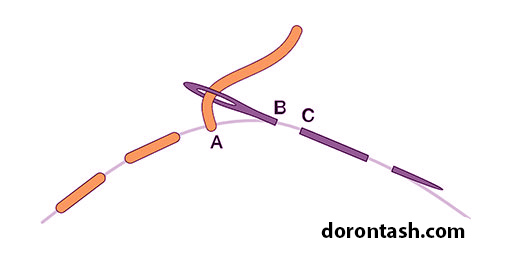
2- Sewing stitches Backstitch
This stitch is one of the most commonly used simple stitches in hand embroidery. For this sewing, first take the needle out from the back of the fabric and make a stitch according to your design and guide the needle to the back of the fabric. Then, take the needle out of the fabric at the distance of the first stitch and insert it at the end of the previous stitch.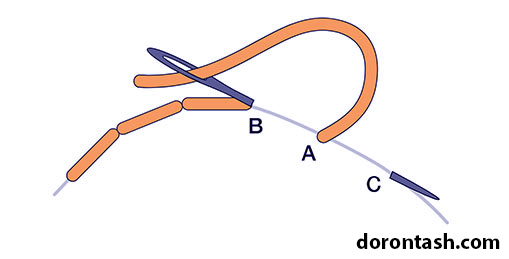
This will ensure the continuity of the stitching and you can create a neat and seamless stitch without gaps.
3- Stem embroidery stitch Stem stitch
Obviously, this stitch is used to fill the stem of the flowers. To start, first take the needle out from the back of the fabric and then make a stitch according to the design and length. Before pulling the thread completely, take the needle out from the middle of the stitch on the line and pull the thread completely until it sits on the fabric. Continue this until the end of the line and at the end tie the thread behind the fabric.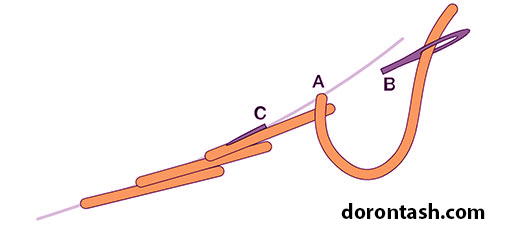
4- middle stitch Split stitch
This stitch is a continuous and regular stitch that is used in sewing many lines, including text, stem, border, etc. First, take out the needle from the back of the fabric and make a stitch, take out the needle from the middle of the threads of the first stitch and make another stitch of the previous size. And continue this process until the end. This stitch gives you a chain-like appearance, but the chain stitch in hand embroidery has its own technique and method, which we will discuss below.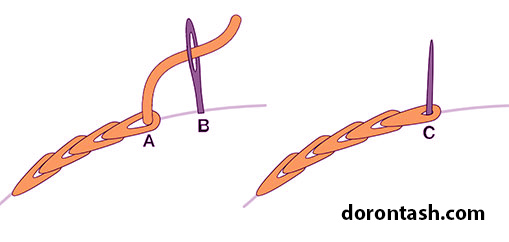
5- chain stitch Chain stitch
Chain embroidery is one of the most beautiful and most used stitches in the art of embroidery, and you can visit Dozi Gol site to buy embroidery accessories and needles for chain embroidery. To perform this stitch, you must first insert the needle from under the fabric and insert the needle again at the same point in the fabric. Before pulling the thread completely, leave a loop on the fabric for you and put the needle about half a centimeter forward. Take the line out of the fabric and pass it through the loop and pull the thread completely. To create a series of continuous chains, you have to continue this work until the end of the mark line that you have decided for yourself.
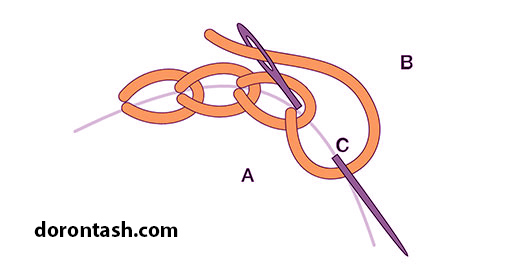 So insert the needle again into the fabric at the same point where you took the needle out and before you pull it completely, take it out half a centimeter further and pass it through the formed loop.
7- French knot sewing French knot
French knot stitch is one of the decorative and beautiful stitches and is usually used to fill the middle of flowers. To do this stitch, insert the needle into the fabric and wrap several turns of thread around the needle. Then put your finger on the threads you twisted and insert the needle somewhere near the starting point on the other side of the fabric. The more you wrap the thread around the needle, the bigger the knot will be.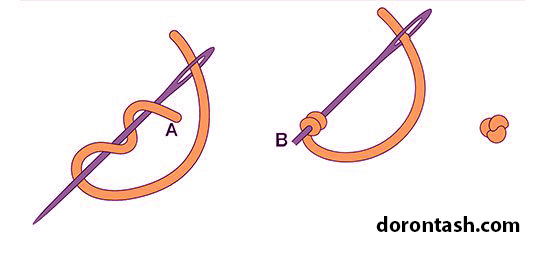
8- Flying stitch (fern or crow’s feet stitch) | Fly stitch
For this sewing, you need a series of marks, it is better if the marks you put are in a linear direction and the intervals are regular. According to the picture, first take the needle out from point A and insert it into point B and take it out from point C, make sure that the needle passes through the loop and pull it down, if the fern stitch is linear and continuous, a Make a long stitch and repeat the steps to the end of the stitch. Otherwise, fasten it according to the picture.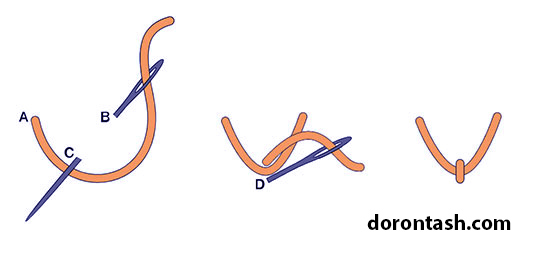
9- feather stitching Feather stitch
Take out your needle from behind the fabric. Insert the needle along the stitch to the right of the starting point. Take out the needle below the distance between the two points of the fabric and pass it through the loop and tighten the loop. Your first stitch is complete. Decide if you would like your next stitch to go right or left. Place your needle along the stitch either on the right or left side and repeat the previous step. Now your second stitch is complete. Continue in the same way. You can tweak to the left, then to the right, and then to the left again. Or try 2 stitches on the right and 2 on the left for a different look. To finish the last stitch in the row, slip a small crochet stitch over the loop and secure it in place.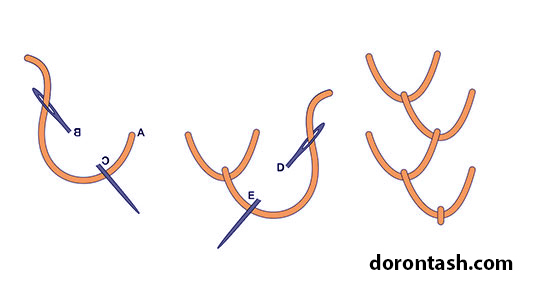
10- Stitching mouse teeth Blanket stitch
Ratchet stitch creates a simple decorative edge and can also be used for surface embroidery. To start, bring your needle up from the back and over the edge. Bring your needle back around the edge and through the back of the fabric where you started, making a loop around the edge. Insert your needle through the loop you just made into the edge of the fabric. Now your thread is anchored and you are ready to start the first stitch. Insert your needle through the edge and through your starting stitch. Pull your needle forward and around the edge and through the loop. Pull the stitch tightly. Repeat for more stitches.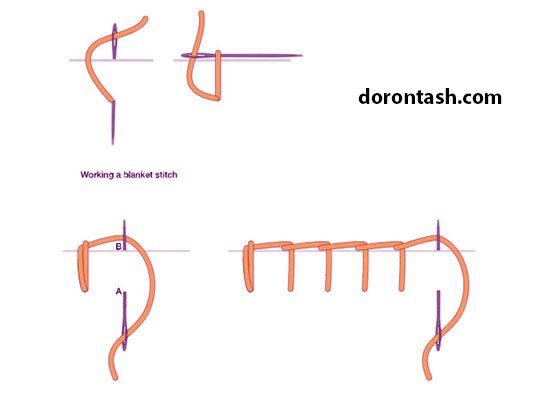
11- Satin embroidery (ball embroidery, back and forth stitching) | Satin stitch
Toper dozi is called waterfalls that are sewn together. Filling stitches are used to fill leaves, petals, writings and any surface you want to fill. For fuller stitching, you can make the direction of the stitches horizontally, vertically and diagonally, and it completely depends on your design and taste. For this sewing model, it is enough to insert the needle into the fabric from the right side and take it out from the left side. Note that it is better to always start sewing from the middle or the widest part of the design and move towards the sides or narrower parts.
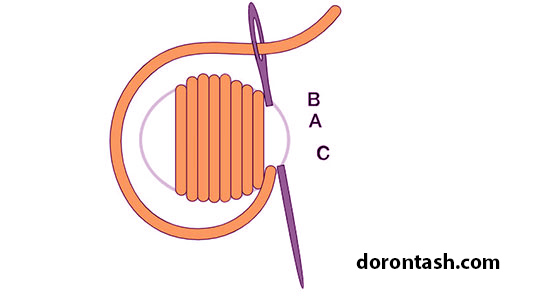 The most important thing is not to use this stitch for large and wide surfaces because it does not have much effect and beauty, it is better to use stitch number 12 in these designs.
12- Silk embroidery (short and long stitch) | Long and short stitch
The long and short stitch is great for filling large spaces completely. You can also change the colors for both lines to get a blended effect and light shade. First, determine the shape you want to fill. Work the first row of stitches along the edge of the shape. Alternate between long and short stitches with other short and long stitches. . Continue doing this until the desired level is completely filled. You can use this stitch for petals, leaves and all surfaces, note that this stitch is a surface stitch and the result is similar to machine stitches, that’s why it has a high value.
These stitches are the main and most commonly used basic stitches in hand embroidery. We hope you will use this tutorial and prepare yourself for professional sewing.
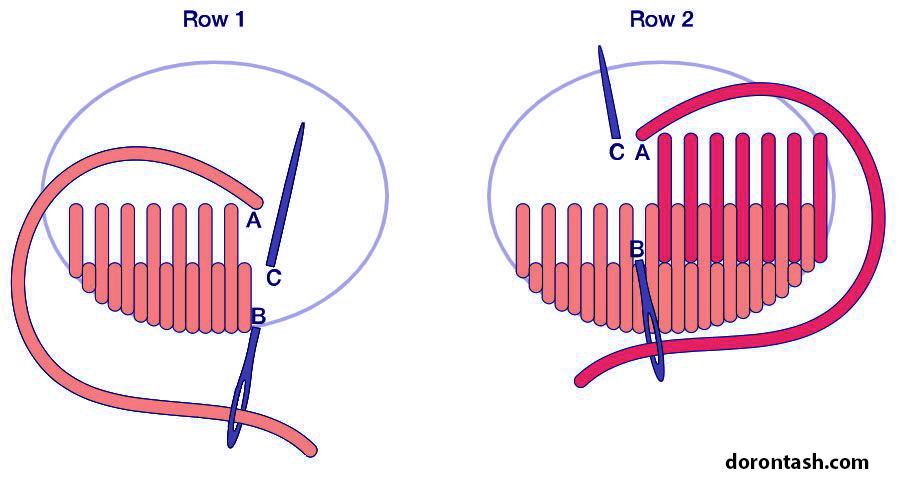 When sewing such stitches in its standard form, you can make one from the top and one from the bottom, or you can continuously insert the needle into the fabric several times so that when you pull it out, you have created several simple stitches at the same time. People who are new to this art, it is better to sew the stitches grain by grain, one from the front and one from the bottom, because the distance between the stitches may not be accurate by working at once.

